Comprehensive Guide to Troubleshooting Ride Tech Air Suspension Systems
Ride Tech systems are popular among car enthusiasts who want to upgrade their vehicle’s suspension. With the ability to fine-tune ride height and handling, these systems deliver a customizable driving experience that makes them stand out. However, as with any advanced automotive technology, they can sometimes run into issues. This guide will explore common problems associated with Ride Tech air suspension systems and provide actionable tips to keep your system running smoothly.
Understanding Ride Tech Systems
Ride Tech specializes in air suspension systems designed for performance and comfort. Unlike traditional coil spring or leaf spring setups, air suspension allows for adjustable ride height and improved handling dynamics. The company offers products like the RidePro and E5 systems, both of which enable users to tailor their vehicle’s suspension for different driving conditions, from daily commuting to high-performance racing.
With Ride Tech systems, drivers can enjoy benefits such as:
- Adjustable ride height
- Enhanced handling
- Improved ride comfort
- Custom tuning for different driving scenarios
Yet, like all mechanical and electronic systems, Ride Tech suspensions can encounter challenges. Understanding these common issues is the first step toward troubleshooting and ensuring the system works at its peak.
Common Issues with Ride Tech Systems
Even with their advanced features, Ride Tech systems are not immune to malfunctions. Below are some of the most common problems users may face and the reasons behind them:
1. Inconsistent Ride Height

One of the most common complaints with air suspension systems is inconsistent ride height. You may notice that the vehicle doesn’t maintain the desired height or that it varies while driving. This issue can stem from:
- Improper calibration: If the system is not correctly calibrated, it can cause uneven height.
- Air pressure fluctuations: Leaks in air lines or bags can cause air pressure to drop, affecting ride height.
Solution:
- Ensure the system is calibrated according to the manufacturer’s instructions.
- Inspect the air lines for leaks, using soapy water to identify any bubbles that may indicate a leak.
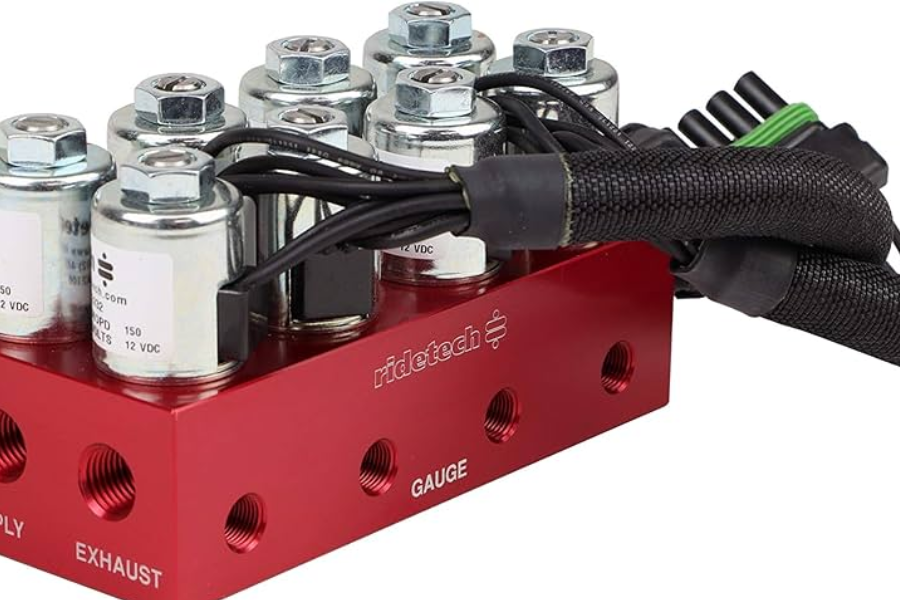
2. Air Leaks
Air leaks are another frequent issue with Ride Tech systems. Leaks can cause your ride height to drop, reduce overall performance, and even strain the compressor, leading to further problems.
Solution:
- Regularly inspect all fittings, hoses, and air bags for signs of wear or damage. Use soapy water to check for air bubbles, which can help pinpoint leaks.
- Tighten or replace damaged fittings or hoses immediately.
3. Compressor Malfunctions
A malfunctioning compressor can prevent the air suspension system from maintaining adequate pressure. This issue may result from electrical problems, faulty wiring, or a blown fuse.
Solution:
- Check all electrical connections to ensure they are properly wired and free from corrosion.
- Inspect the compressor’s fuse and replace it if necessary.
- If the compressor doesn’t activate, test the connections to ensure the compressor is getting power.
4. Calibration Failures
Calibration failures are usually the result of errors during the setup process. These failures can trigger error codes, such as:
- ERROR 167: Calibration failure.
- ERROR 161: Low vehicle voltage.
Solution:
- Review the system’s calibration settings and ensure everything is aligned correctly. Follow the instructions in the user manual for resetting the calibration process.
- Make sure the vehicle’s battery has sufficient voltage to support the system.
Troubleshooting Steps for Ride Tech Systems
When troubleshooting your Ride Tech system, following a structured approach can save time and help you pinpoint the issue faster. Here are some essential troubleshooting steps:
Step 1: Check Electrical Connections
Electrical problems are a common cause of compressor and suspension system failures. Begin by examining all electrical connections, especially those tied to the compressor and control unit.
Key Areas to Inspect:
- Display harness connections
- Compressor wiring and battery connections
- Grounding wires
Make sure the connections are tight and free from corrosion.
Step 2: Inspect Air Lines and Fittings
Air leaks are often the culprits behind suspension problems. Check all air lines and fittings, paying special attention to areas that may be subject to wear or pressure changes.
Tip: Use soapy water to detect leaks. Any bubbling when the system is pressurized indicates a leak that needs to be addressed.
Step 3: Test the Compressor
If your system’s compressor isn’t functioning, it could be due to electrical issues or a blown fuse. Try activating the compressor manually to determine if it’s functioning correctly.
If the Compressor Doesn’t Activate:
- Check the fuse and replace it if needed.
- Inspect the wiring to ensure all connections are intact.
- If the compressor still doesn’t activate, it may need to be replaced.
Step 4: Review Calibration Settings
Calibration errors can arise during setup or over time. If your system isn’t maintaining the proper ride height or seems erratic, revisit the calibration settings.
Solution:
- Follow the manufacturer’s calibration procedure carefully.
- If problems persist, reset the system as instructed in the user manual.
Advanced Troubleshooting Techniques
In some cases, standard troubleshooting steps may not resolve the issue. Here are a few advanced techniques that may help.
1. Software Updates
Ride Tech systems often rely on software to control various features. Outdated software can lead to compatibility issues and erratic performance.
Solution:
- Regularly check for software updates through the Ride Tech website or app. Ensure your system is running the latest version to avoid glitches or errors.
2. Professional Assistance
Sometimes, the problem may be too complex for DIY troubleshooting. If you’ve exhausted all other options, it may be time to seek professional assistance from a technician familiar with Ride Tech systems.
Tip: Reach out to Ride Tech-certified professionals who have experience with these systems. They can provide in-depth diagnostics and repair services.
Preventative Maintenance Tips for Ride Tech Systems
To extend the life of your Ride Tech system and avoid common issues, regular maintenance is key. Here are some maintenance tips to ensure your system runs at its best.
1. Regular Inspections
Frequently inspect your air suspension system for signs of wear or damage. Regular checks can help catch small problems before they turn into expensive repairs.
Inspect:
- Air bags for wear or cracking
- Fittings and hoses for leaks or damage
- Compressor performance
2. Proper Installation
A well-installed system is less likely to encounter issues. If you’re not confident in your ability to install the system, it’s wise to hire a professional to ensure everything is set up correctly.
3. Monitor Air Pressure
Keep an eye on air pressure levels in your air bags. If pressure fluctuates or drops suddenly, inspect the system for leaks or calibration issues.
Conclusion
Troubleshooting a Ride Tech air suspension system can seem intimidating at first, but understanding the common issues and their solutions makes it much easier. Whether it’s an inconsistent ride height, air leaks, or compressor malfunctions, addressing these problems early on can prevent more significant issues down the road.
By following the troubleshooting steps outlined in this guide, keeping your system up-to-date with the latest software, and adhering to regular maintenance practices, you can enjoy a smooth, adjustable ride for years to come. If problems persist, don’t hesitate to seek professional help to ensure your Ride Tech system remains in peak condition.
Facts:
- Ride Tech Systems: These air suspension systems offer adjustable ride height and improved handling for a customized driving experience.
- Common Problems: The most frequent issues include inconsistent ride height, air leaks, compressor malfunctions, and calibration failures.
- Troubleshooting Approach: Regular checks of electrical connections, air lines, and fittings are essential for resolving many issues. Testing the compressor and reviewing calibration settings can also address common problems.
- Advanced Troubleshooting: Software updates and professional diagnostics may be necessary for more complex issues that standard troubleshooting cannot resolve.
- Preventative Maintenance: Routine inspections of air suspension components, proper installation, and monitoring air pressure levels can help prevent most common problems.
FAQs:
- What are the common problems with Ride Tech air suspension systems?
- The most common issues include inconsistent ride height, air leaks, compressor malfunctions, and calibration failures.
- How can I fix inconsistent ride height on my Ride Tech system?
- Check the system’s calibration and inspect for air leaks in the lines. Ensure the system is calibrated according to the manufacturer’s instructions.
- How do I detect air leaks in my Ride Tech suspension?
- Use soapy water to check for air bubbles around fittings, hoses, and air bags, which can indicate a leak.
- Why isn’t my Ride Tech compressor working?
- Compressor malfunctions may be caused by electrical problems or a blown fuse. Check wiring connections and the fuse box, and ensure the compressor is properly connected to the vehicle’s battery.
- What should I do if my Ride Tech system shows error codes like ERROR 167 or ERROR 161?
- These codes indicate calibration failures or low vehicle voltage. Follow the troubleshooting steps in the user manual to recalibrate the system and check battery voltage levels.
- Do Ride Tech systems need software updates?
- Yes, keeping the system’s software updated is important to prevent compatibility issues and ensure the suspension functions properly.
- How can I prevent issues with my Ride Tech system?
- Regular inspections, proper installation, and monitoring air pressure levels are essential to maintaining the performance and longevity of your Ride Tech system.